For today’s post I have been creating colour blocks on a card.

This card is my contribution to the Design Team’s selection for the latest Festive Friday Challenge, which is celebrating Stand Up To Cancer Day.
We have used this occasion to come up with a list of elements that we call our Inspo List.
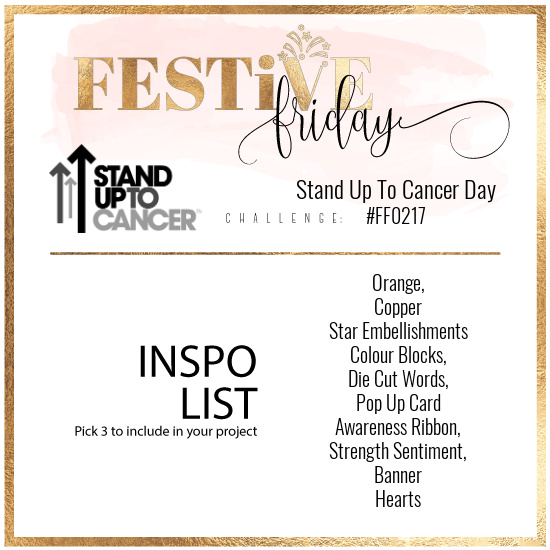
The Inspo List is 10 items you can choose from to create your project in our card making and paper crafting challenge. Incorporate THREE of the items in your project and link up! And guess what? Your project doesn’t have to be about the theme at all! The selected festivity is just a unique way to come up with a fun and interesting inspiration list!
My project used: Orange, Copper, Star Embellishments< Colour Blocks, Die Cut Words
Creating Colour Blocks on a Card
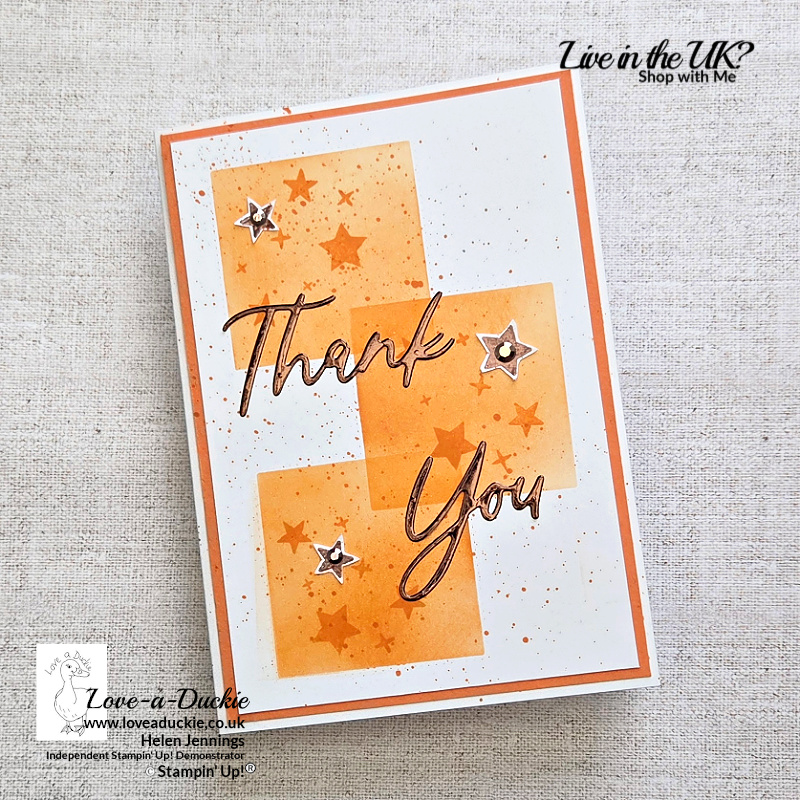
Masked Colour Blocks
I started with a piece of Basic White cardstock and used one of the stitched square dies from the Stylish Shapes Dies to create a simple mask.
Using a Blending Brush and Timid Tiger ink, I blended through the mask three times, positioning the square in different places across the card front. This gave me three overlapping blocks of colour while still leaving plenty of white space around them.
I love how such a simple masking technique can create a really strong graphic background.
Next, I took the small star stamp from the Balloon Festoon Stamp Set and stamped stars over the Timid Tiger blocks using the same ink. I varied the positioning of the stars so that each block was slightly different.
To add a little more texture to the background, I used a Timid Tiger Stampin’ Blend to add some fine splatters across the Basic White panel.
Adding a Touch of Copper
For my sentiment, I used the large Thank You die from the Words of Wishes Dies.
Before die cutting, I added a piece of Earth Tones Metallic Foil to a Double-Sided Adhesive Sheet. The coppery tone of the foil was perfect for another element from the Inspo List.
Once the words were die cut, I simply peeled away the backing from the adhesive sheet and added the sentiment directly to the card front. Using the adhesive sheet makes intricate die-cut words like these so much easier to attach.
Creating My Star Embellishments
Rather than using ready-made star embellishments, I decided to make my own.
I stamped the little stars again onto Basic White cardstock, this time heat embossing them with Copper Embossing Powder. I cut out three of the stars and added them around the sentiment.
A small metallic gem in the centre of each star added one final bit of shine and turned the stamped images into my own little star-shaped embellishments.
To finish the card, I mounted the completed Basic White panel onto a Timid Tiger cardstock mat before adding everything to a Basic White card base.
I particularly like the combination of the clean geometric blocks with the looser stamped stars and splattering. And, of course, there is just enough copper shine to catch the light without overwhelming the design.
Let’s Hop
I hope you have enjoyed my project. Do leave a comment if you can, because it certainly makes my day. Then it is time to hop around all the other projects’
How Can I Help?
We love to create these projects to share with you, but we love it even more when you share your projects with us. I hope you will be inspired to join the Festive Friday Challenge and share what you have created, inspired by our Inspo List.
Don’t hesitate to get in touch if I can help with your purchases, or if you have a crafty question.
Meanwhile stay safe and stay well
Helen xx
If you live in the UK, I would love you to choose me as your demonstrator.
- You can shop here or click on the images listed below.
- sign up for my newsletter to receive news and inspiration
- Find out more about joining my team to get a 20% discount on your craft supplies
- email me if I can be of any assistance.
- Make sure you use the current host code so I can thank you for your order.
- Anyone purchasing from me will receive a Tutorial Bundle as a Thank You.

![Stylish Shapes Dies [ 159183 ]](https://assets1.tamsnetwork.com/images/EC042017NF/159183s.jpg "Stylish Shapes Dies [ 159183 ]")
![Words & Wishes Dies (English) [ 167894 ]](https://assets1.tamsnetwork.com/images/EC042017NF/167894s.jpg "Words & Wishes Dies (English) [ 167894 ]")
![Balloon Festoon Photopolymer Stamp Set (English) [ 167602 ]](https://assets1.tamsnetwork.com/images/EC042017NF/167602s.jpg "Balloon Festoon Photopolymer Stamp Set (English) [ 167602 ]")
![Timid Tiger Classic Stampin' Pad [ 165278 ]](https://assets1.tamsnetwork.com/images/EC042017NF/165278s.jpg "Timid Tiger Classic Stampin' Pad [ 165278 ]")
![Timid Tiger Stampin’ Blends Combo Pack [ 165291 ]](https://assets1.tamsnetwork.com/images/EC042017NF/165291s.jpg "Timid Tiger Stampin’ Blends Combo Pack [ 165291 ]")
![Versamark Pad [ 102283 ]](https://assets1.tamsnetwork.com/images/EC042017NF/102283s.jpg "Versamark Pad [ 102283 ]")
![Metallics Wow! Embossing Powder [ 165678 ]](https://assets1.tamsnetwork.com/images/EC042017NF/165678s.jpg "Metallics Wow! Embossing Powder [ 165678 ]")
![Adhesive Backed Metallic Gems [ 163780 ]](https://assets1.tamsnetwork.com/images/EC042017NF/163780s.jpg "Adhesive Backed Metallic Gems [ 163780 ]")
![Timid Tiger A4 Cardstock [ 165298 ]](https://assets1.tamsnetwork.com/images/EC042017NF/165298s.jpg "Timid Tiger A4 Cardstock [ 165298 ]")
![Basic White A4 Cardstock [ 166781 ]](https://assets1.tamsnetwork.com/images/EC042017NF/166781s.jpg "Basic White A4 Cardstock [ 166781 ]")
![Basic White A4 Thick Cardstock [ 159230 ]](https://assets1.tamsnetwork.com/images/EC042017NF/159230s.jpg "Basic White A4 Thick Cardstock [ 159230 ]")