Today I am sharing with you these Christmas in July projects that have been created by fellow Demonstrator, Sarah Bullen. They would be easy to adapt to projects for any time of the year and with our designer series paper sale now on, there is no better time to plan to create projects like these.
Christmas in July Place Holder and Table Gift
Product ListStamp : Elegantly Said Cling Stamp Set [155095] £21.00
Card Stock : Poppy Parade A4 Cardstock [121694] £8.25 , 2021–2023 In Color Shimmer Vellum [155616] £11.25 , Basic White A4 Cardstock [159228] £9.00 , Pattern Party 12" X 12" (30.5 X 30.5 Cm) Host Designer Series Paper [155426] £17.00 , Basic White 3" X 3" (7.6 X 7.6 Cm) Envelopes [159233] £9.25
Tools & Adhesive : Blending Brushes [153611] £11.25
Punch : Banners Pick A Punch [153608] £21.00 , Treasured Tags Pick A Punch [154425] £21.00
Ribbon & Trim : Simply Elegant Trim [155766] £7.00
Accessory : Red Rhinestone Basic Jewels [146924] £6.50 , 3-1/8" X 3-1/8" (7.9 X 7.9 Cm) Acetate Card Boxes [150428] £5.50
Bundles : Evergreen Elegance Bundle (English) [155579] £36.75
Die Cut & Emboss : Stitched Triangles Dies [152710] £33.00
Measurements
- 3 squares of Poppy Parade Cardstock 3” x 3”
- 5 pieces of Poppy Parade Cardstock 3” x 6”
- 1 piece Poppy Parade Cardstock 1.5” x 9”
- Strip of DSP 3” x 6” (for place holder)
- 5 squares of DSP for card fronts 2 7/8” x 2 7/8”
- Strip of DSP for box belly band 1” x 9”
- 1” wide strips of Basic White cardstock for place holder sentiment/name and card sentiments
For those who can never have too much Christmas, why not plan a Christmas in July celebration? These
place holders are quick and simple to put together, as are the cards which make a lovely gift to give to your guests. Feel free to mix up the DSP’s and sentiments based on what you have on hand.
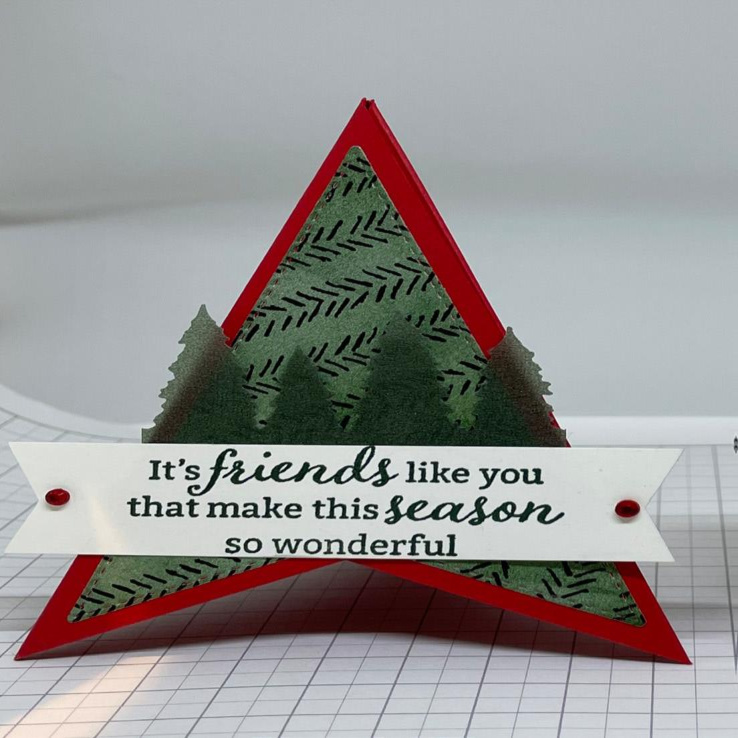
Christmas in July Place Holder Instructions:
- Score the 3 square pieces of Poppy Parade cardstock diagonally down the centre of each piece.

- Adhere one edge of one of the pieces to the score line of the second piece, ensuring that the centre piece is the top piece.

- Do the same with the third piece, this time on the other side, again, ensuring that the centre piece is on top.
- Fold the outer triangles inwards, as well as the centre triangle
- Take your chosen DSP and, using the Blending Brushes colour your DSP with Evening Evergreen ink,
- Using the second largest triangle from the Stitched Triangles Framelits, cut four triangles from your patterned paper.
- Adhere these triangles to the four outer cardstock triangles.
- Place adhesive on the inner top edge of one of the outer triangles then fold and attach to the outside of the opposite triangle, so the place holder stands up by itself.
- Stamp and punch sentiment from Evergreen Elegance Stamp Set (or write guest’s name) on one of the 1” wide strips of Basic White cardstock, trim to desired size and punch ends with the Banners Pick A Punch
- Punch Trees from Evening Evergreen vellum using the Evergreen Border Punch.**using vellum with punches can be tricky, particularly with more detailed punches. Try punching with a piece of paper or cardstock behind the vellum to make it a little easier to remove. Just be mindful of the extra thickness, particularly if using cardstock)**
- Adhere tree border behind sentiment, add red rhinestones to ends of sentiment tag then attach to front of place holder.
Instructions for Christmas in July Table Gift

- To make cards, score 3” x 6” pieces of Poppy Parade cardstock at 3” on long side.
- Adhere DSP squares to front of card bases.
- Stamp “Little card, Big Thanks” sentiment from Flowers of Friendship Stamp Set onto 1” wide strips of Basic White cardstock, trim to 3” then punch ends using Treasured Tags Pick A Punch.
- Attach to front of card using mini dimensionals and add red rhinestones to ends of sentiment tag.
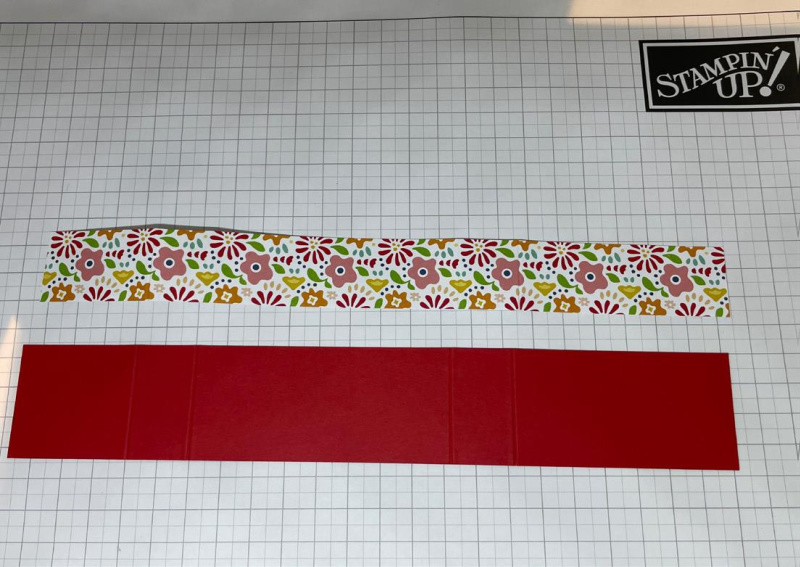
- To make belly band, take Poppy Parade (1.5” x 9”) and DSP (1” x 9”) strips and score both pieces at 1.5”, 2 1/4”, 5 1/2” and 6 1/4”.
- Attach DSP strip to centre of Poppy Parade strip, ensuring the score lines march up.
- Fold on score lines and use acetate box as guide to adhere ends together.
- Stamp ‘For You’ sentiment from Elegantly Said Stamp Set onto 1” wide piece of Basic White cardstock. Trim to desired length and punch one end using Banners Pick A Punch. Punch small hole in top end
- Wrap piece of Simply Elegant Trim around belly band twice, attach tag and secure.

How Can I Help?
I hope you have been inspired by sarah’s lovely projects and will give them a go yourself.
Meanwhile stay safe and stay well
Helen xx
If you live in the UK, I would love you to choose me as your demonstrator.
- You can shop here or click on the images listed below.
- sign up for my newsletter to receive news and inspiration
- Find out more about joining my team to get a 20% discount on your craft supplies
- email me if I can be of any assistance.
- Make sure you use the current host code so I can thank you for your order.
- Anyone purchasing from me will receive a Tutorial Bundle as a Thank You.
