I have been creating 3D heart embellishments with fine tip glue on this dinosaur card for someone you love. This is my project for the Build & Bloom Stampers Blog Hop, which this month has a theme of Love & Friendship.

We are a group of Demonstrators, led by Louise, seeking to learn, implement and improve our use of technology and online resources in our businesses.
Creating 3D Heart Embellishments With Fine Tip Glue
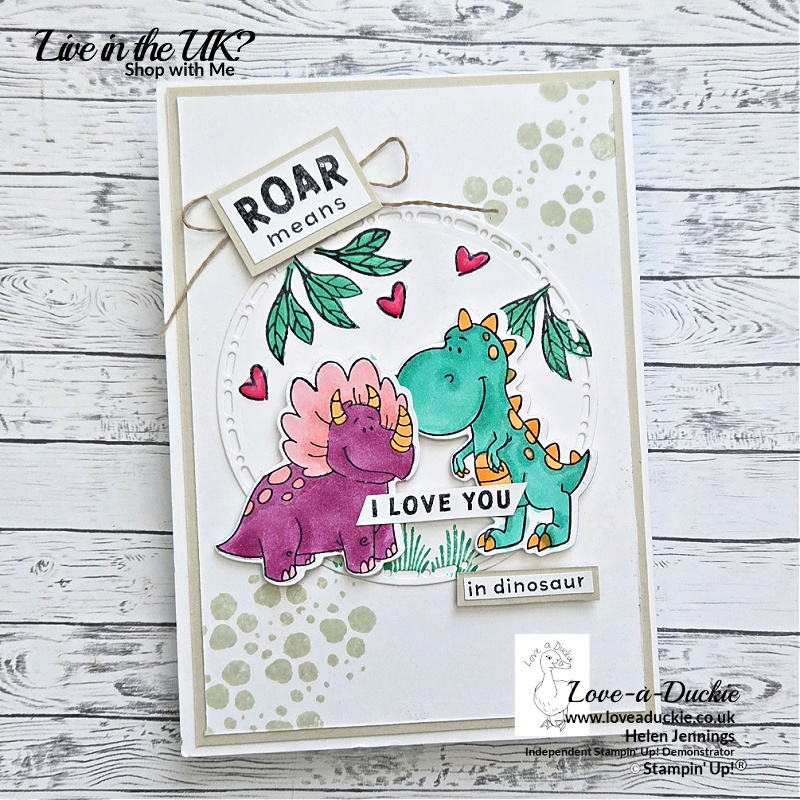
For this card I used the cute Darling Dino bundle. This is a prefect set to create cards for dino lovers of all ages.
| A4 Metric Cardstock | Imperial Letter Size Cardstock | |
| Th Basic White Card Base | 21cm x 14.9cm | 8 1/2″ x 5 1/2″ |
| Basic Beige | 14.4cm x 10 oddment for sentiment | 5 1/4″ x 4″ oddment for sentiment |
| Basic White | 13.9cm x 9.5cm 10cm x 10cm die cut circle oddment for sentiment | 5″ x 3 3/4″ 4″ x 4″ die cut circle oddment for sentiment. |
You can see a full list of the products I have used at the end of the post, including links to my online shop.
Instructions

Let’s Hop
- Score and fold the card base. Burnish with a bone folder.
- Add the Basic Beige mat to the card front.
- Use the blotches image from the Darling Dino bundle to stamp onto the Basic White mat on the top right and bottom left.
- Die cut the circle from the Spotlight on Nature set. Stamp some grass on the bottom in Shy Shamrock. Stamp some leaves on the top in Memento ink and colour with Shy Shamrock Stampin’ Blend.
- Stamp 3 hearts in Memento and colour with Strawberry Slush Stampin’ Blend. Use a fine tip glue pen and fill in the hearts with the glue. This will dry with a glossy 3D finish.
- Add the circle to the card front.
- Stamp two dinosaurs on Basic White card and colour with Stampin’ Blends. I used Summer Splash and Peach Pie for one and Pretty in Pink, Petunia Pop and Peach Pie for the other. Die cut the dinosaurs and add to the circle with dimensionals
- Stamp the two sentiment pieces onto white card. in Memento Cut the “Roar means” piece into 2 sections and back them with Basic Beige. Add a bow of Linen Thread behind the “Roar means” piece. Add these two backed pieces to the card front with dimensionals. Shape the ends of the “I Love You” piece and add between the two dinosaurs with dimensionals.
I hope you have enjoyed my project. Do leave a comment if you can, because it certainly makes my day. Then it is time to hop around all the other projects
How Can I Help?
Don’t hesitate to get in touch if I can help with your purchases, or if you have a crafty question.
Meanwhile stay safe and stay well
Helen xx
If you live in the UK, I would love you to choose me as your demonstrator.
- You can shop here or click on the images listed below.
- sign up for my newsletter to receive news and inspiration
- Find out more about joining my team to get a 20% discount on your craft supplies
- email me if I can be of any assistance.
- Make sure you use the current host code so I can thank you for your order.
- Anyone purchasing from me will receive a Tutorial Bundle as a Thank You.